Give Your Onion Seedlings a Haircut!
If there's one crop that I love to grow indoors from seed, it's onions. Of course you can buy sets from your local hardware store or nursery, but there are usually only a few varieties available.
So not only do I have a larger selection of onion types to choose from if I buy the seeds online and grow them myself, but I can start them earlier indoors and give them plenty of time to grow before they get planted out.
~~~~~~~~~~
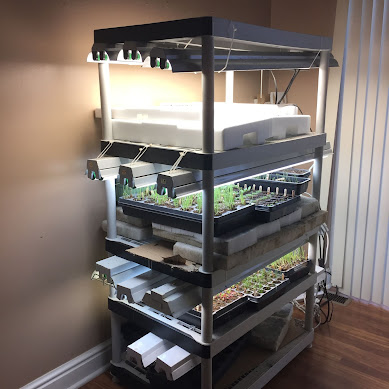
See the end of this article for information about my seed starting setup
~~~~~~~~~~
Here in Ohio, our onion plant out date is around April 1. I can start my onions indoors as early as the end of January and let them grow indoors under lights until plant out time.
There's a trick to keeping those onion seedlings manageable as the tops grow very quickly. Give them a haircut!
As you will notice in the above picture, there are several seeds in each cell. I multi-sow my onion seeds. I put five to eight onion seeds in each cell. When I go to plant them out, I have the option of separating them into any number of plants I want to plant together.
With these blocks, I will probably just pull the cell of onions in half and plant that way. As the onions grow, I can just harvest the outer onions as young, spring onions and let the others continue to grow to full size. I find it saves space, both indoors under my grow lights and in the field.
I follow the Charles Dowding multi-sow method for many of my indoor-grown seedlings. Here's a link to his YouTube video about multi-sowing if you're interested in growing onions the same way.
~~~~~~~~~~
Onion Growing Tip
Onion seeds are only viable for one to two years at best. Always use fresh seed! Bottom heat will also help with germination.
~~~~~~~~~~
How to Cut Back the Seedling Tops
Trimming onion tops or giving them a haircut is as simple as it sounds. You just cut them back to a few inches from the soil level.
As soon as the onion seedlings start to get long or tangled or grow up into the grow lights, cut them back again.
Bonus - Eat the trimmings like chives!
 |
| Onion Seedlings after their haircut |
Above is a picture after their haircut. I will do this several times until I can finally plant them out.
 |
| Seed Starting Trays Click to View |
Why Trim Onion Seedlings Back?
Every time you cut back the top growth of the onions, the plants are forced to put their energy into the bulb and not the leaves, making for larger, healthier onions in the long run. Once they're planted outside, care for them as you normally would.
I look forward to sowing onion seeds every year indoors. It's one of the earliest plants I can start to grow to scratch my early food-growing itch!
 |
| Seed Starting Heat Mat Click to View |
~~~~~~~~~~
Tip
A seed starting heat mat really does help with the germination of heat-loving plants like onions and peppers.
~~~~~~~~~~
I only have so much room under my one grow light stand, so multi-sowing seeds, like onions, allows me to save room in that valuable real estate.
Just keep giving them a haircut and watch them grow into healthy happy seedlings ready to plant out!
My Homemade Seed Starting Setup
I've seen the price of some of those seed starting setups. Although my setup wasn't exactly cheap, it's much less than a lot of those that are sold ready to use and I use mine from season to season.
 |
| Plastic Shelving perfect for a Seed Starting Setup Click to View |
A large plastic shelf like the one above is perfect for constructing a seed starting setup.
The lights I use are basic, cheap - and I mean the cheapest -- shop lights I could find. I know some people say you have to have Agrobrite or LED specialty grow lights to grow healthy seedlings indoors, but they can cost from $50 to over $100!
I have found that the cheapest shop lights I can find do the job well, as long as you keep the seedlings close to the lights. I've had great success for several years.
I've attached the lights with zip ties as pictured.
The only real disadvantage I see in doing it this way is that the lights here do not move up and down as the seedlings grow taller.
And since it's paramount that seedlings stay within an inch of the lights, and since the lights don't move, I must move the trays up or down manually. I don't find that a big deal. Some people might.
I just use some big thick styrofoam blocks under the trays. If you look closely above in the full setup picture, you can see them.
 |
| Seed Trays with Individual Cells Click to View |
I can fit 12 full-size seedling trays on this setup, and since I multi-sow most of the plants that I grow, the amount of starts that I can grow is plenty for my large garden.
 |
| Seed Trays Click to View |
You could also just seed start in the trays, but I prefer the tidiness of the individual cells. And I use them year after year. I also prefer the cell trays and a tray like above at the bottom so I can bottom water all the seedlings which saves lots of time when you're growing a lot.
~~~~~~~~~~
So what are you waiting for? If you haven't started to grow your own food, start now! With the current warnings of coming food shortages, you'll be glad you did!


No comments:
Post a Comment